Have you heard of Notion? It’s a free-to-use productivity tool released back in 2012, but it’s grown in popularity the past year. I began using Notion when I started working at Inflow as the editor-in-chief and organic content manager.
Since then, I’ve become known as the Notion aficionado among my colleagues and freelancers. Don’t get me wrong - I’m the least organized person I know in physical context! I just have a knack for digital organization, and I wanted to share my Notion knowledge so everyone — especially ADHDers — can understand how to use this tool to accomplish whatever their goal may be.
Note: we do not earn any commission from any clicked links!
What is Notion?
Notion is a tool found online, as a web app, and as a mobile app. It’s free-to-use, 100% customizable, and can help with a variety of goals. (If you're more interested in learning how to use Notion on your phone, read our guide for mobile users!)
What can Notion be used for?
The limit does not exist! (Mean Girls reference)
Here are just a few things you can do with Notion:
- Project management and tracking for managers and freelancers
- Knowledge database for work or personal interest
- Calendar and reminders
- School materials for studying or thesis planning
- To-do lists and kanban boards
- Pinterest-style idea boards with photos
- Wikis and guides
- Note-taking
- and so much more!
The most important things to know as a Notion beginner
Before you continue reading, I highly recommend opening Notion another tab in your browser so you can follow along with this guide!
It’s best to learn by doing!
Keyboard shortcuts and commands
Before you start making pages and databases, I recommend getting familiar with shortcuts and commands. They make everything so much faster! Here are the ones I use the most:
1. Forward slash (/)
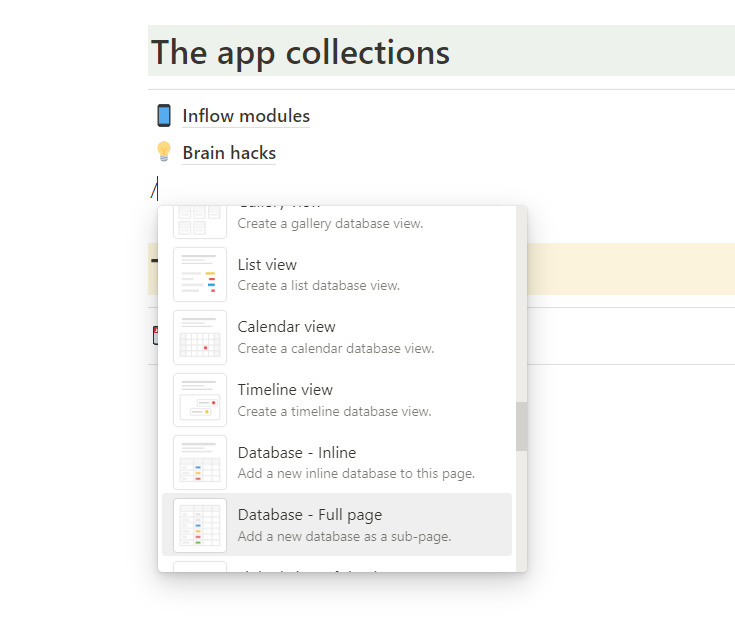
The forward slash can be used for basic formatting and adding new elements. When typing on a page, add “/” and a list of commands will pop up. But don’t scroll through them! You can just start typing and suggestions will filter through, kind of like a Google search.
The commands I use the most:
- [add new] Database (full page)
- To-do lists
- Toggle lists
- Headings 1, 2, and 3
- Upload or embed image
- [add new] Page
Note: This is the easiest way to create a new database! Inline databases embed into your current page, while full page databases open as a new, nested page. (You can turn inline databases into full pagers any time.)
2. Tagging (@)
This is mostly useful for teams.
Type the @ symbol and begin typing the person’s name. They’ll be notified of the new mention.
3. Dividers (---)
Dividers are a simple and clean way to separate blocks of text.
Instead of typing the forward slash to find the Divider command, just type a hyphen (-) 3 times in a row on a new line and the divider will appear.
4. Emojis (:)
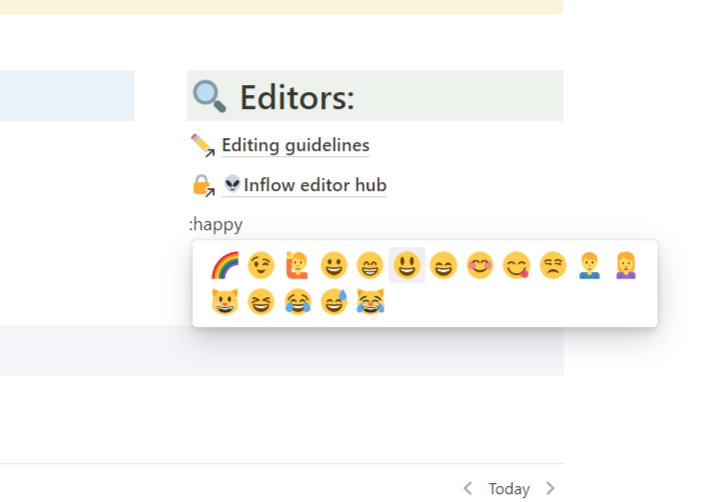
To quickly add an emoji or icon, type a colon ( : )
From there, start typing the name of emoji you’d like to add, just like you can do in your phone’s keyboard. Use your keyboard arrows to select the emoji, and click Enter.
5. Bullet lists (-)
To quickly add a bullet list, type a single hyphen (-) followed by a space. This automatically formats a bullet list.
To add a new item on a new line, just hit Enter.
6. Numbered lists (1.)
Similar to the bullet list, a numbered list can be added by typing a number, immediately followed by a period. (1.)
Then, hit the spacebar, and the list indents and adds a new number each time you hit Enter.
Databases
Databases are the heart of Notion. These are collections of cards or “pages”.
A database’s usability depends on how it's set up. (Note: pages can exist on their own and do not need to be part of a database!)
Each card opens to an entirely new page you can use for anything — even another database! But let’s keep it simple for now and proceed with the assumption that the pages in your database are going to be blank (without text), but will have multiple properties.
Database properties
Properties add more information to your database pages. Not only are properties useful for simple organization, but they can also be used to group certain pages together, track progress on projects, and filter out pages for specific views.
(Views are explained after the properties section!)
Here are — in my opinion — four of the most useful properties, and what they can be used for:
1. Multiselect: tag your database page topics
.png)
I use the multiselect option for topic-tagging. One of my favorite things about this is that you can customize the tag colors and add emojis. But if you prefer the clean look, you can just use a single color (like grey) for all of your tags.
Tags can be anything you’d like, but they’re most useful when one tag can apply to multiple pages in your database.
For example, if your database is titled “video games”, you could add a Skyrim page with the tags: open world, combat, and magic. You could then add a Metroid Dread page with the tags: 2D; combat; and aliens.
Then, if you apply a filter to only show pages that have the combat tag, both games would appear.
2. Select: group your pages into categories
.png)
The select property is similar to multi-select, but can only host a single tag in the property (per page/card). This is useful when you have multiple categories or groups that wouldn’t belong in more than one group.
For example, I made a content database for my teammates at Inflow. Each of the ADHD modules belong in a single category, and I used the select property to categorize the modules.
You can adjust property settings on the top right corner of the table and modify the Group by… setting to “group by module category”.
You would then see all the modules grouped beneath their respective category (and the categories can be toggled to minimize overwhelming visual input!)
3. Date: track appointments, meetings, and deadlines
.png)
This is the most useful property to have if you’re a grad student, freelancer, or if you’re someone who has lots of things scheduled (exams, track practice, dentist appointments, etc.)
This property also comes with an end date option, a time option, and a format option.
Adding end dates:
This is helpful if you’re tracking multiple projects at once. I have this property applied to my blog database for freelance writers so they can monitor deadlines for all of their assignments.
Formatting dates:
This is a high-level usage feature, but when you’re comfortable with this property, play around with the format by selecting “edit property” or "date format and timezone".
My favorite format is called relative because instead of “11/30/2022” it would say something like “next Tuesday” or “tomorrow”.
4. Checkbox: keep track of tasks
I use this property for my Meetings database, and it’s titled “Concluded?”.
Once a meeting is over, I click the checkbox. This property is more useful if you set up additional views for your database so you can toggle between “concluded meetings” and “upcoming meetings”. (Hint: at the top of your database, click add view)
Other properties that are available include:
- Relational (this is an advanced property I use to connect multiple databases, but I won’t detail it here!)
- Text (general notes or descriptions)
- Created by (person that added page)
- Time created
- Number (numerical entries that can be added together)
- Formula (to be honest, I never use this, but I’m sure it’s useful for someone somewhere!)
- Email address
- Phone number
- URL
- Files and media
Database views
Each database you create can be viewed in different formats! As far as I know, there isn’t a limit on how many views one database can have.
You can also use the same type of view (i.e. table view) more than once for a database and apply different filters or sorts. (Mentioned above)
Some formats won’t work for certain databases, though. For example, it wouldn’t make sense to use a calendar view for a database that doesn’t have dates associated with it. But I’ll leave it at that for now — let’s explore views you can use!
1. Table view
.png)
This is — hands down — my favorite view on Notion. It makes the most sense to my brain because you can see as many (or as few) properties as you want!
❗ Required properties for use: none required
💡 Recommended use: literally anything
2. List view
This is the most basic view. It’s most useful if you have very few properties attached to your database.
❗ Required properties for use: none required
💡 Recommended use: Alphabetized lists (sort by title; ascending)
3. Calendar view
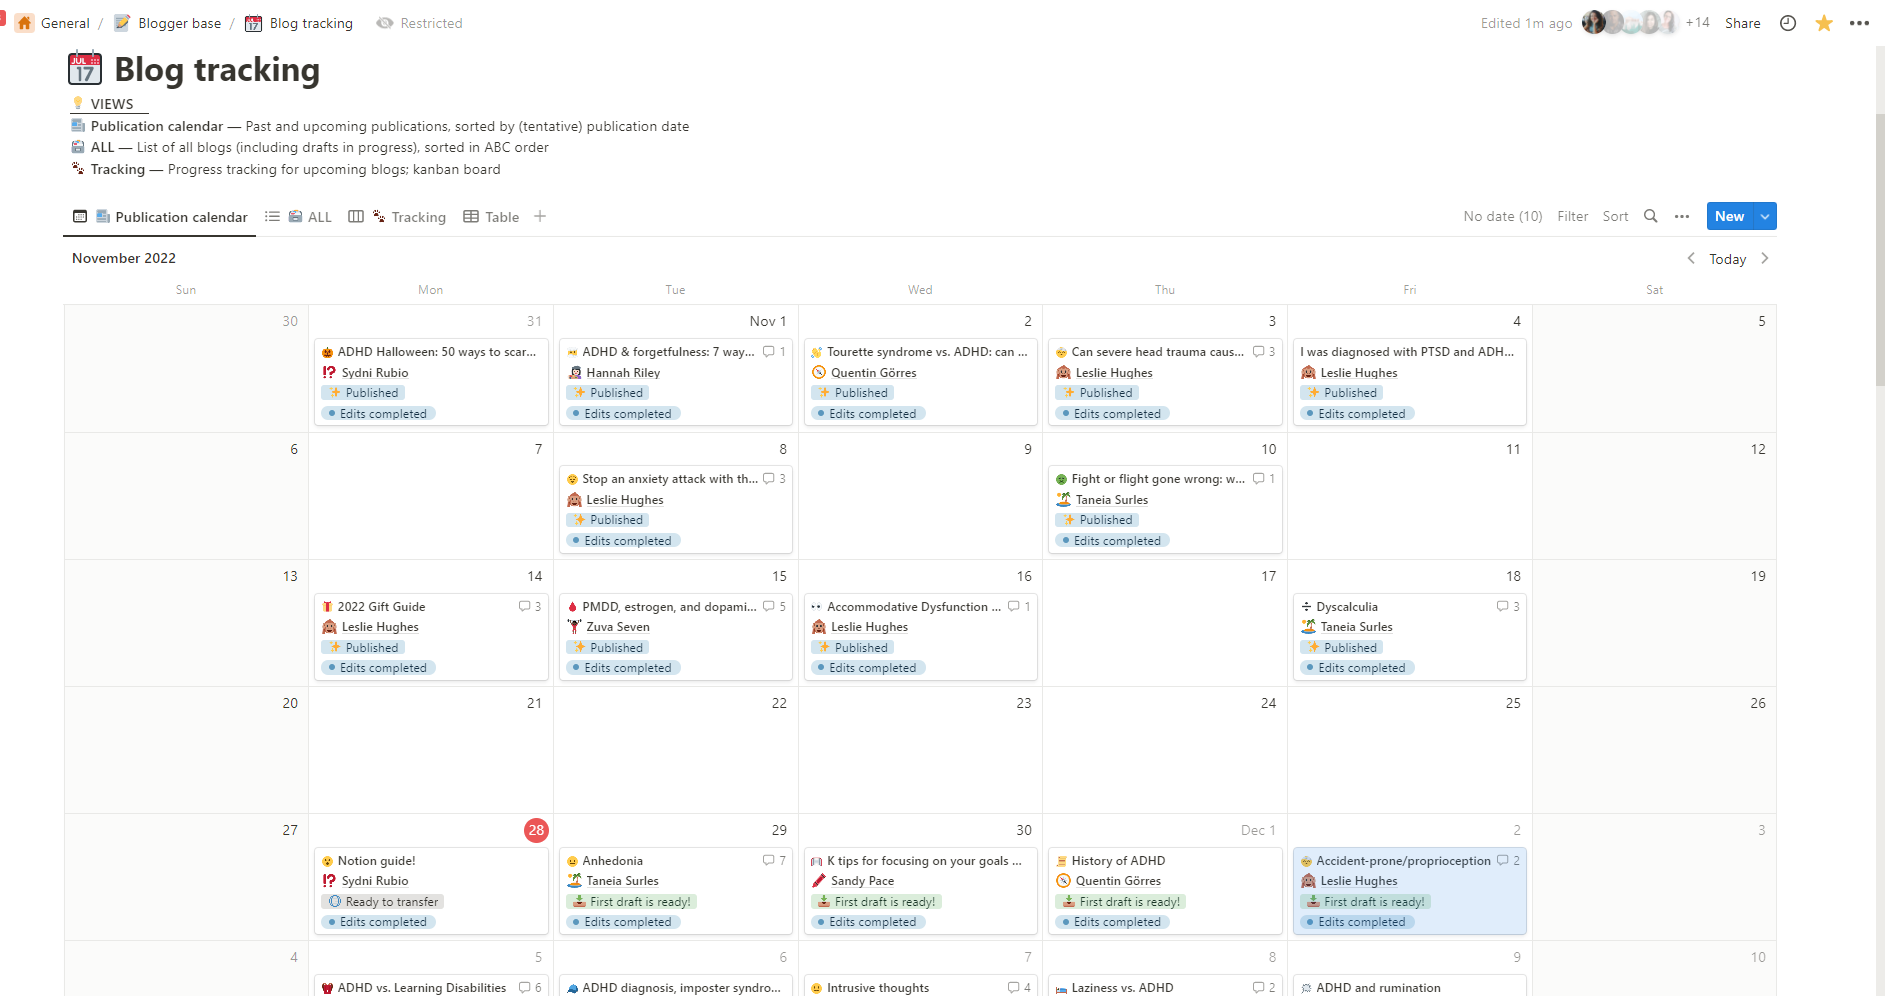
This is handy for keeping track of anything with a date tied to it. For example, I have a calendar view for the blog database I share with my writers. It shows all previous and upcoming article publications in calendar format.
❗ Required properties for use: Date
💡 Recommended use: Tracking and visualizing events, appointments, deadlines, etc.
4. [Kanban] Board view
.png)
If you’re a fan of Trello (or other kanban boards), this one should be easy for you! If not, here’s a quick description - Each card has a specific tag in the select (or status) property. These can be customized to things like Not started, In progress, and Completed.
Create a board view to see the cards lined up in columns depending on their tags. Order them in a way that makes sense. For example, Not started would be all the way on the left, while Completed would be on the right.
You’ll also see a group containing cards that do not have a tag for this property. I like to hide this group by clicking the three dots and selecting Hide from view.
❗ Required properties for use: you should have a select property (or status property) that’s used in your database, otherwise the board won’t know how to sort the pages.
💡 Recommended use: Progress-tracking multiple things at once — job applications, content creation, etc.
5. Gallery view
.png)
Calling all Pinterest lovers and vision board aficionados!
I have this view applied on my writer profiles page for freelancers — you can see all of their beautiful faces in one place! (Then you can click each card to expand more info.)
❗ Suggested properties for use: images; alternatively, written content within the page card can be displayed instead of an image
💡 Recommended use: Inspiration or vision boards, recipes, directories, etc.
6. Timeline view
.png)
This is another view heavily based on dates, and is likely the least useful view. (But only because it has a very specific purpose!)
❗ Required properties for use: Date and an end date
💡 Recommended use: project management and tracking with multiple deadlines and projects
Other Notion tips for beginners:
1. Everything is a block!
.png)
Every line of text, bullet list, header — they’re all moveable blocks. Instead of having to cut and paste a bunch of times, just drag the block to move it. This is done by hovering your mouse to the left of the block where you’ll see 6 dots appear.
Click and drag! (For mobile users, hold your finger down on the block to move it) Also, click the dots for a menu of options regarding the text block.
From the menu, you can turn it into another type of block (like a header or a new page), or you can customize it. (See tip #2!)
2. Get creative!
.png)
Customize your pages with icons and emojis, and cover photos. I also like using different colors to make sections and headers stand out. Do this by clicking the 6 dots next to your header block and find the Color option. From there, choose to change the color of the text or the color of the highlight strip behind the text that goes across the entire page.
3. Formatting is your friend
.png)
Headers
Use headers to establish hierarchy. This will be easier to absorb information and understand how topics are related.
There are 3 headers to use in notion:
- Heading 1 - largest
- Heading 2 - mid-sized
- Heading 3 - smallest (but larger than regular text)
Toggle lists and toggle headers
If you’re adding a lot of information or pages to a single page, consider using a toggle list or header. It makes it easier to skim for relevant information. Plus, it looks cleaner and it's less overwhelming!
4. Start with a blank page and work your way out
It doesn’t have to be perfect right away! I have plenty of amazing databases that started off as confusing, jumbled bullet lists on a Notion page.
Use bullet lists to outline
I recommend using a bulleted list to start. Think of this starting point as a brain dump — all you need to do is type anything and everything you can think of right now, then you can start to organize your bullets. (Remember how everything is moveable? This applies to single list items as well!)
For example, let’s say your notion page is for a research paper on ADHD. What would you need to have on your page for this? Due dates? Citations and sources? Specific information and notes?
Ok, now for the "specific information and notes" ... what would you need to include? Make sub-bullets for topics like “types of ADHD” (and then sub-sub bullets for “inattentive”, “hyperactive-impulsive”, and “combined”.)
Once you start to get overwhelmed with the amount of bullets you have, that’s when you turn them into separate databases, pages, headers, toggle lists, etc.
That’s all, folks! (for now)
In the interest of not overwhelming people who are already overwhelmed, I’ll stop there and revisit this in a follow-up article sometime. If you have any specific questions about using Notion, send me an email: sydni@getinflow.io
Once I’ve gathered enough questions about more topics or clarifications, you can expect another Notion guide for intermediate users!